Install Arch Linux inside a VM (full setup)
2026-09-24
My host system is running Fedora Linux 44:
sushant@home:~$ cat /etc/os-release
NAME="Fedora Linux"
VERSION="44 (KDE Plasma Desktop Edition)"
RELEASE_TYPE=stable
ID=fedora
VERSION_ID=44
VERSION_CODENAME=""
PRETTY_NAME="Fedora Linux 44 (KDE Plasma Desktop Edition)"
ANSI_COLOR="0;38;2;60;110;180"
LOGO=fedora-logo-icon
CPE_NAME="cpe:/o:fedoraproject:fedora:44"
DEFAULT_HOSTNAME="fedora"
HOME_URL="https://fedoraproject.org/"
DOCUMENTATION_URL="https://docs.fedoraproject.org/en-US/fedora/f44/"
SUPPORT_URL="https://ask.fedoraproject.org/"
BUG_REPORT_URL="https://bugzilla.redhat.com/"
REDHAT_BUGZILLA_PRODUCT="Fedora"
REDHAT_BUGZILLA_PRODUCT_VERSION=44
REDHAT_SUPPORT_PRODUCT="Fedora"
REDHAT_SUPPORT_PRODUCT_VERSION=44
SUPPORT_END=2027-05-19
VARIANT="KDE Plasma Desktop Edition"
VARIANT_ID=kde
Arch torrent download and VirtualBox setup
For downloading Arch Linux, the preferred method is to use a torrent. I used ktorrent for this. Download the latest Arch Linux ISO’s torrent file from here. Please keep your client open for some time after downloading the file to help the community more. Try to maintain a 2:1 (up:down) ratio to fulfill your duties towards the Arch Linux open-source community.
sudo dnf install -y ktorrent
ktorrent /path/to/the/arch/.iso.torrent/file
Download the latest version of VirtualBox from here for your current host distribution. Then run this to install VirtualBox (replace dnf with your package manager):
sudo dnf install -y kernel kernel-devel
sudo dnf install -y /path/to/the/vbox/.rpm/file
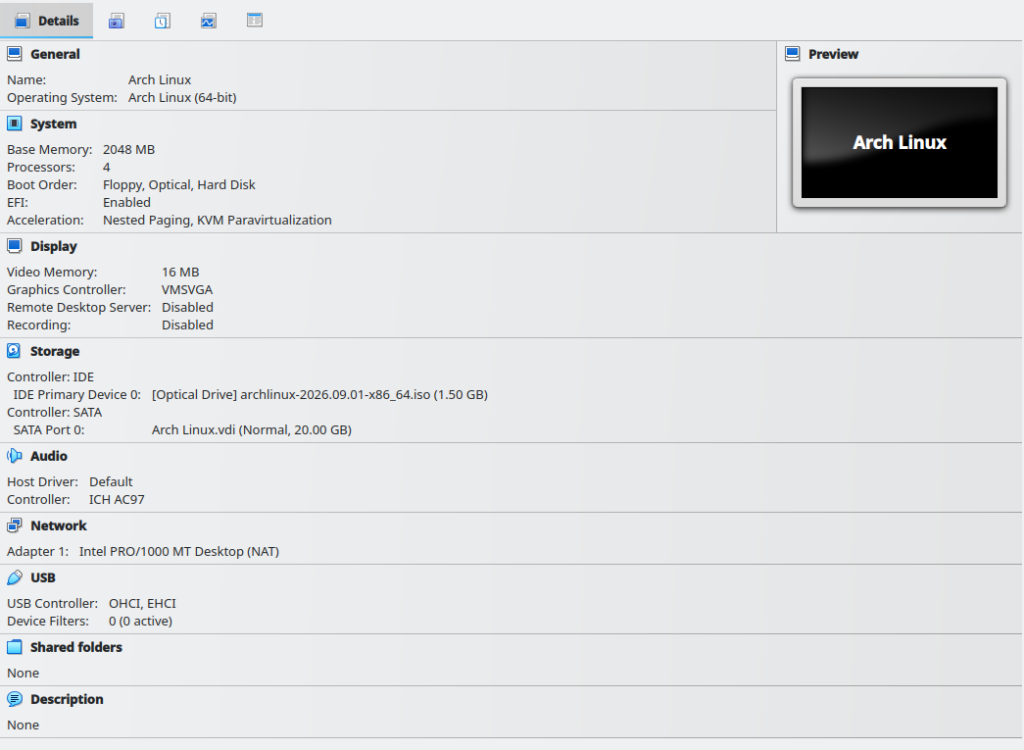
Create a new VM with the below config (approx.). Use the .iso image that was downloaded using the torrent:
Install Arch
Boot the VM with the Arch image loaded. You should get a live Arch installation environment. The prompt starts with something like:
root@archiso ~ #Check OS release:
cat /etc/os-releaseIdentify the VM’s disk:
lsblk
lsblk -f
Set up the partition table
# Switch `sda` with the storage device you are creating the partition table for.
fdisk /dev/sda
Aim for this ideal partition table:
| Use | Partition (NAME) | Mount point (MOUNTPOINTS) | Type (FSTYPE) | Size (FSAVAIL) | Command to create the partition (last sector) |
|---|---|---|---|---|---|
| UEFI | /dev/sda1 | /mnt/boot | vfat | 1G | +1G |
| Swap | /dev/sda2 | [SWAP] | swap | 2G | +2G |
| Root | /dev/sda3 | /mnt | ext4 | 17G | [Press <RETURN>, default = remaining size] |
Tip: Create the partitions in the order listed above. Also, press <RETURN> everywhere to set them to their default values.
I forgot to use g in the first-install phase. Do NOT repeat my mistake, because the systemd-boot bootloader requires a GPT partition table. Follow these keystrokes in order; change wherever necessary:
g
n
1
<RETURN>
+1G
n
2
<RETURN>
+2G
n
3
<RETURN>
<RETURN>
t
1
1
t
2
19
p
w
Before using w to write the partition table to the disk (DANGER: it modifies the partition table of the disk live), ensure you have made the correct partition table (refer to the above table) using p.
Format the partitions
# Use FAT32 for the EFI partition.
mkfs.fat -F 32 -n EFI /dev/sda1

# Assign swap.
mkswap /dev/sda2

# Use EXT4 for the root partition.
mkfs.ext4 /dev/sda3
Mount the file systems
mount /dev/sda3 /mnt
mount --mkdir /dev/sda1 /mnt/boot
swapon /dev/sda2
Verify the new partition table
lsblk -fInstall Arch
# Requires an internet connection to the VM.
pacstrap -K /mnt base linux linux-firmware
Make the file systems persistent
genfstab -U /mnt >> /mnt/etc/fstab

# Verify
cat /mnt/etc/fstab
Chroot and complete the remaining VM setup (except the bootloader)
# This lets you boot into your computer without actually booting into it.
arch-chroot -S /mnt

# Time
ln -sf /usr/share/zoneinfo/Asia/Kolkata /etc/localtime
hwclock --systohc

# Localization
echo "LANG=en_US.UTF-8" >> /etc/locale.conf
echo "KEYMAP=us" >> /etc/vconsole.conf

# Network
echo "arch-vm.sushantmondal.com" >> /etc/hostname

# Recreate `initramfs`.
mkinitcpio -P

# Set a password for `root`.
passwd root
systemd-boot bootloader
Installation
# Install the `systemd-boot` bootloader.
bootctl install

# Verify
bootctl status
Use a text editor like vim to edit the configuration files
# Install the `vim` text editor.
pacman -S --noconfirm vim

# Verify
vim --version | head -n 1
loader.conf
When systemd-boot reaches the boot menu, it should use the arch.conf configuration file as the default boot entry.
vim /boot/loader/loader.conf

# Enter the insert mode to start editing.
<ESC>
i

# Append this.
default  arch.conf
timeout  4
console-mode max
editor   no

# Save and exit `vim`.
<ESC>
:wq
<RETURN>

# Verify
cat /boot/loader/loader.conf
arch.conf
vim /boot/loader/entries/arch.conf

# Enter the insert mode to start editing.
<ESC>
i

# Use this format.
title   Arch Linux
linux   /vmlinuz-linux
initrd  /initramfs-linux.img
options root=UUID=xxxxxxxx-xxxx-xxxx-xxxx-xxxxxxxxxxxx rw

# The easier method to replace the UUID is given below.

# Write only this inside `vim`:
title   Arch Linux
linux   /vmlinuz-linux
initrd  /initramfs-linux.img
options root=UUID=

# Save and exit `vim`.
<ESC>
:wq
<RETURN>

# Append the root's UUID with rw dynamically directly from the shell.
echo "$(blkid -s UUID -o value /dev/sda3) rw" >> /boot/loader/entries/arch.conf

# You need to manually remove the newline between `options root=UUID=` and the UUID. Use `vim` and do it.

# Verify
cat /boot/loader/entries/arch.conf
Verify whether the configuration files were correctly implemented
bootctl list
ls -l /boot/EFI/BOOT/BOOTX64.EFI
Exit the chroot and shut down your system
exit

# Unmount recursively.
umount -R /mnt

shutdown
Eject the .iso virtual disk from the VirtualBox interface before booting into the system again
- Open Oracle VirtualBox Manager.
- Click on the Machines icon (left panel).
- Select the VM running Arch Linux.
- Click on the Settings icon in the top ribbon.
- Switch to Expert mode.
- Go to the Storage tab.
- Select the Arch Linux
.isoimage file under Controller: IDE. - In the Optical Drive option, click on the blue CD icon on the right.
- Select the Remove Disk from Virtual Drive option from the dropdown.
Bibliography
Categories: Server Hosting
Tags: arch-linux, install, linux, virtualbox, vm
Leave a Reply